Remember this? Follow up here.
Yes, after many days of bad weather, it's finally done. As i don't have the luxury of a humidity controlled paint booth, it's not possible for me to paint on rainy days. Unknown to both my client and i,the rainy weather sets in after the collection of the instrument. Not forgetting the deadly Morakot was during that period.
So after painting this white, i realized white guitar in such shape does requires some tasty vision to visualize it. Nice choice of color i must say.
I hope you do like the stuff you see here. I would appreciate if you would follow my blog or leave a comment as these are good motivating food :) Thanks!
Wednesday, September 23, 2009
Thursday, September 10, 2009
Schecter Neck Broke
My next impossible task is on this beautiful schecter C1-Elite.
Say OUCH!
When Shaun first showed me his images of the broken headstock, i told him it should be a
simple fix and he is lucky. But at that point of time, the headstock was not detached like
what you are looking at now. The first impact create only a big crack at the rear. Oh did i
just said first impact?
Yes! During our meet up, i was helping Shaun to carry his guitar. Naturally i took the sling
and sling it up on my shoulder. Guess what, the plastic that holds the strap in place broke
and causing the whole guitar falling onto the floor for a second impact. I was pretty sure
that Shaun was really terrified at the moment.
"No worries, it's in my hands now", i said.
So the guitar went through some clamping and gluing. At that point of time, i know the steps but i'm wondering to what extend could i perfect the repair to.
Here we have the front and rear shot of what's left after removing the clamp and sanding away the excess glue. Pretty neat huh? The reddish brown is actually the mahogany.
So next time is pretty much repainting the damaged area and polishing it to shine. I guess there is a reason why many people prefers to repair a black guitar. It's the easiest to match color after all.
I always thought that neck with such reinforcement area on the rear of the headstock and neck joint are much stronger. Seems like it's pretty much the same as a normal design. I guess the best design that prevents headstock breaking could most probably be the fender style.
Anyway, the Schecter is now good as new! Well i mean at one glance, you'll probably not know what it had gone through! I hope Shaun is feeling way better now :D
Say OUCH!
When Shaun first showed me his images of the broken headstock, i told him it should be a
simple fix and he is lucky. But at that point of time, the headstock was not detached like
what you are looking at now. The first impact create only a big crack at the rear. Oh did i
just said first impact?
Yes! During our meet up, i was helping Shaun to carry his guitar. Naturally i took the sling
and sling it up on my shoulder. Guess what, the plastic that holds the strap in place broke
and causing the whole guitar falling onto the floor for a second impact. I was pretty sure
that Shaun was really terrified at the moment.
"No worries, it's in my hands now", i said.
So the guitar went through some clamping and gluing. At that point of time, i know the steps but i'm wondering to what extend could i perfect the repair to.
Here we have the front and rear shot of what's left after removing the clamp and sanding away the excess glue. Pretty neat huh? The reddish brown is actually the mahogany.
So next time is pretty much repainting the damaged area and polishing it to shine. I guess there is a reason why many people prefers to repair a black guitar. It's the easiest to match color after all.
I always thought that neck with such reinforcement area on the rear of the headstock and neck joint are much stronger. Seems like it's pretty much the same as a normal design. I guess the best design that prevents headstock breaking could most probably be the fender style.
Anyway, the Schecter is now good as new! Well i mean at one glance, you'll probably not know what it had gone through! I hope Shaun is feeling way better now :D
Saturday, September 5, 2009
8888 Visitors!
Thank you for visiting my blogsite and going through my humble collection of repairs and modifications! Although this site counter was not implemented when this blog started and does not represent the time and effort i've put into my work. I'm still glad that i've now 8888 visits!
The Gr3y Story(simplified)
The story started since the first day i took the daring attempt to risk modifying on my own electric guitar. I wanted something that looks different and special but i was a kid and cannot afford anything expensive. My friends who were richer were all using nice guitars with fancy appearance and those artist on tv is always using something that would cost over 2-3k!
Although that first guitar i modified did not successfully leave the surgery table, i never stop and gave up. The first ever guitar i did all the damage on was a Vantage sunburst superstrat which i bought off cashconvertor(I don't even know where are the guitar shops in Singapore back than)
It was later painted into chrome. Sadly i can't find any of the photo though i do remember taking them. The chrome didn't work out and was ready for a backup plan soon after. So i sanded it and got it repainted. Eddie was very much influencing me that time and thus the following color scheme. Ok i admit i'm being ambitious to paint a chrome and later a frankenstrat color theme when i don't really know how to paint a guitar. But it's this ambitious mind that kept me going.
The guitar may look presentable in this photo but the real thing is not as it seems. The cavity filling is really bad, the paintjob is very uneven and i even tried scalloping on the board but it's a big mess. At current stage, the guitar's neck is already warped and i'm only keeping it as a display in my room. I'm still proud of it being my first ever guitar modification project. Also, the headstock bears the name of a person i adores :)
If you are a budding repair/modification enthusiast thinking about trying out guitar repairs etc, my piece of advice is that this is not something that you can do when you know the steps. There are tones of information floating online(e.g. my tutorials) and as well as in books and video. I'm sure you could google it easily. However, it is much like cooking, the receipe is only there as a guide. To succeed, trail and error at own cost(time,money and effort) is unavoidable. Patience is the key element :)
I'm not sure where will this never ending quest of guitar modding and repairing leads me to but whatever it is, i'm very thankful for all that allowed my quest and hobby to live on! Without you guys, i can't possibly be modding that much of guitars(i can't possibly own lots and lots of guitar right?)
Cheers to 8888 visitors!
Best Regards,
Vincent
Wednesday, September 2, 2009
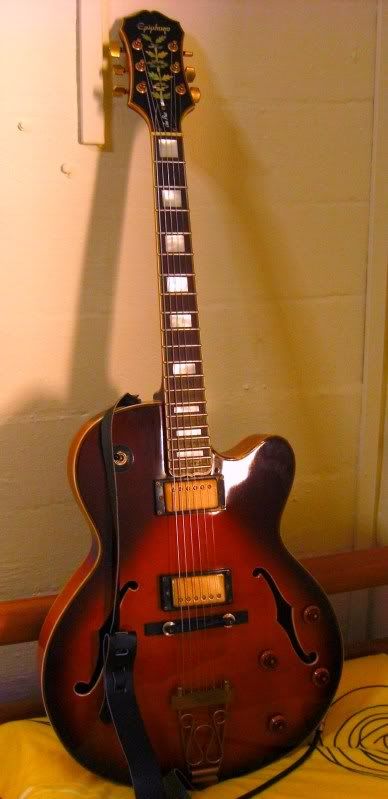
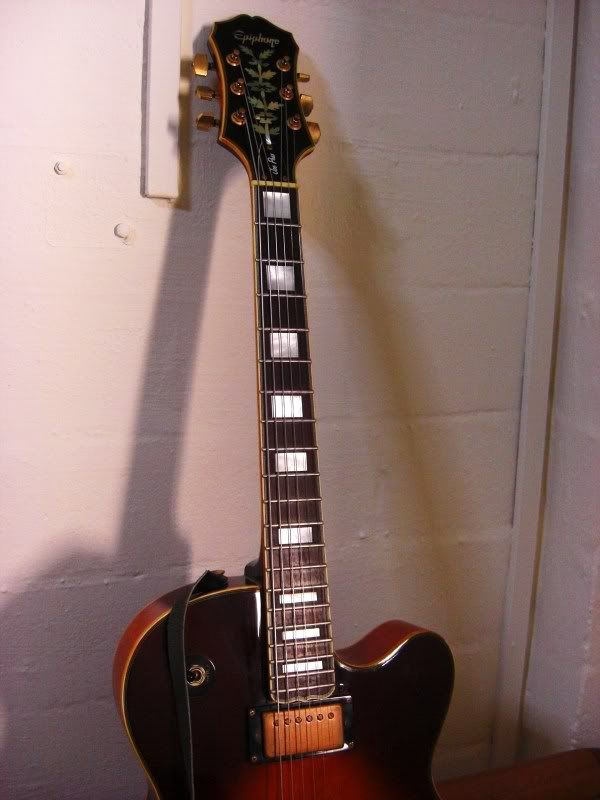
Epiphone Joe Pass
Owner requested to replace the original plain plastic inlays with some real mother-of-pearl blocks.
Though it's a seemingly simple job, the big block makes inlaying on a fretted board exceptionally difficult. I'm glad i managed to finish the task and the owner love the end results. :D
So why MOP? It gives a lively 3D depth with vibrant color of commonly pink,green and blue. It's hard to resist isn't it?
Subscribe to:
Posts (Atom)