Showing posts with label Paint Job. Show all posts

Wednesday, January 27, 2010

Orville LP update


After some trail and error, i've finally got the red wine color. This is seriously a lot more work then i expect it to be. Anyway, time for clear-coating!
Hopefully it can be completed before Chinese New Year!

Friday, December 18, 2009

The season of celebration = the season of guitar repair ?

Hi folks!

So i believe you've seen the neck refinish of the Yamaha superstrat but i believe i've not mention about some special pickup wiring to be done!

Photobucket

Basically, this is much like a typical wiring but with a twist.
The 1st knob is master volume, which also allows split coils for both the neck and middle pickup.
The 2nd knob is master tone, which also allows split coils for the bridge pickup.
This set up allows a total of 12 possible setting!

Next up, Ben from En-X is definitely 1 strange person! You should see his guitar collection and you'll understand what i mean.
So here we have one of his purple strat and it's here for some unique make over.

From what i know, Ben loves to fish.
Now i know, Ben loves the swimming pool too!
A full swimming pool route! Sorry, the routing is not complete in this photo. There are supposed to be 2 more deeper channel by the side for humbucker mounting. Forgive me, I was too busy with this guitar that i forgot about taking photo!

So why the swimming pool? Yes you've got it right! He got some wacky idea set for this purple monster! I'll leave that for later :)


Oh yes, the BFG Orville!
Nah! It's that black Orville that's now undergoing some serious make over.
Look at those grains! I really wonder what causes them to decide painting this anything but BLACK! If you're to ask me, that's some very sexy grain pattern! The new red wine will definitely bring this Orville back to it's glory!

I've not really handled much of EMG, especially the 7 strings. I'm not much a heavy metal person and i guess people around me are not too. Anyway Cedric of Meza Virs decides that i's time for some nasty 7 string acts but the EMG is just not fitting into his guitar. I'll post more of the completed installation which will require me to route and fix up the pickup.

Mama Mia! Look at this beauty!
I love the looks of Telecaster, especially when they are blonde or golden like this one.
This baby was here for a setup, it's playing really sweet now!

Thanks for reading and hopefully i'll update soon!

Best Regards,
Vincent

Friday, December 11, 2009

Photo Intensive Update!

Hi Folks,

I'm sorry for not updating my blog site for such a long time. I was busying with my rock school exam :) Don't worry, I'm back! But while i was away, magical constantly happens in my small little workroom.

Remember the broken Gibson SG? Here's a picture that will put a smile to some of you :)

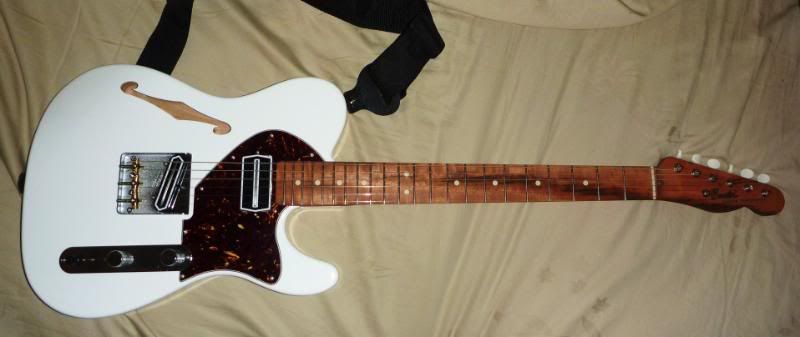
Although it's not completed, i thought it'll be a good idea to tell you guys she is now in 1 piece and ready to rock in no time! I can't wait to complete and start playing it!

I'm also in the midst of doing some frankentele.. Well at least i've...
Sliced a tele bridge into 2..
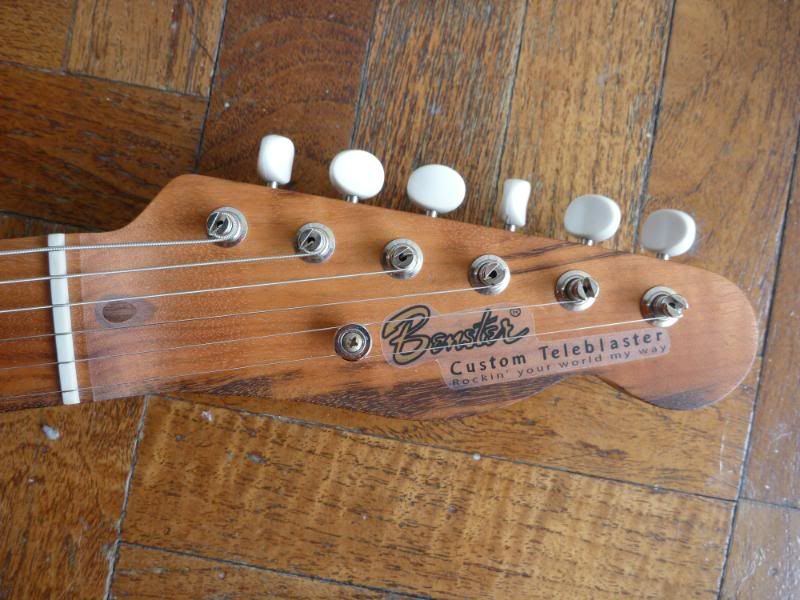
...and made some funky and funny decal to match it! The result?
I'll keep it a secret for the moment :)

Speaking of decal.. Recently Benjamin of En-X contacted me to do him a customized decal for his new tele. I'm happy to have worked with him on this. The ideas are from him and i did the illustration and production of the decal.


A classic Yamaha also came into my bay~
What can you do when you've sanded your guitar neck and it ends up looking like this?


Easy! Send to me of course :D
As of this stage, it's almost complete. I'll need to do a little polishing.

Another classic, the Orville Les Paul! This is a pretty beat up old Orville. So the owner decides to repaint it into red wine color. Let's see if i can get it nailed ;)

Sugizo's material finish eclipse?

I hope i can make myself work harder and update this site at a much more constant rate! Your encouragement definitely helps!

Best Regards,
Vincent

Wednesday, September 23, 2009

Some Acquired Taste

Remember this? Follow up here.

Yes, after many days of bad weather, it's finally done. As i don't have the luxury of a humidity controlled paint booth, it's not possible for me to paint on rainy days. Unknown to both my client and i,the rainy weather sets in after the collection of the instrument. Not forgetting the deadly Morakot was during that period.

So after painting this white, i realized white guitar in such shape does requires some tasty vision to visualize it. Nice choice of color i must say.


I hope you do like the stuff you see here. I would appreciate if you would follow my blog or leave a comment as these are good motivating food :) Thanks!

Thursday, September 10, 2009

Schecter Neck Broke

My next impossible task is on this beautiful schecter C1-Elite.
Say OUCH!
When Shaun first showed me his images of the broken headstock, i told him it should be a
simple fix and he is lucky. But at that point of time, the headstock was not detached like
what you are looking at now. The first impact create only a big crack at the rear. Oh did i
just said first impact?

Yes! During our meet up, i was helping Shaun to carry his guitar. Naturally i took the sling
and sling it up on my shoulder. Guess what, the plastic that holds the strap in place broke
and causing the whole guitar falling onto the floor for a second impact. I was pretty sure
that Shaun was really terrified at the moment.

"No worries, it's in my hands now", i said.

So the guitar went through some clamping and gluing. At that point of time, i know the steps but i'm wondering to what extend could i perfect the repair to.

Here we have the front and rear shot of what's left after removing the clamp and sanding away the excess glue. Pretty neat huh? The reddish brown is actually the mahogany.


So next time is pretty much repainting the damaged area and polishing it to shine. I guess there is a reason why many people prefers to repair a black guitar. It's the easiest to match color after all.


I always thought that neck with such reinforcement area on the rear of the headstock and neck joint are much stronger. Seems like it's pretty much the same as a normal design. I guess the best design that prevents headstock breaking could most probably be the fender style.

Anyway, the Schecter is now good as new! Well i mean at one glance, you'll probably not know what it had gone through! I hope Shaun is feeling way better now :D

Monday, August 24, 2009

Tutorial (Decal Application)

In this post, i'll try my best to show you how to apply a decal to your headstock. Do not skip any of the steps while going though this tutorial. If you have any question, you can simply post in the comment box and i'll get back asap.


1st
Cut the decals to size, keeping a small gap away from the printed area. Check if it fits nicely on the headstock or in your case the desired position.


2nd
Soak them into warm water. Cold or room temperature water will work as well but warm water allows the decal backing to be separated from the decal faster. This allows the glue of the decal to remain. Cold or room temperature water will take longer to allow the decal and backing to separate, also causing the glue of the decal to be less effective. It should take not more than 2mins for warm water.

3rd
Look carefully in this picture, the decal and the backing are now able to slide away from each other. Always slide and not peel like you would on sticker. It should be a very easy and gentle process, soak more if you need to apply pressure to slide it out.


4th
Slide the decal onto the desired location, adjust while the decal while it is still wet. You may use your finger but not any sharp object. The decal is very fragile at this stage.


5th
Use your finger to slide out excess water underneath the decal. Be gentle as the decal tends to tear at this stage. After that, use a lint free cloth or anything mild to wipe out the excess water.

6th
If you have been following so far and not skipping the steps, good. The next info is the most crucial part! The above 5 pictures have a big problem. To apply a decal, always make sure your wood is already sealed with a layer paint or sealer. If you do not do so, the clearcoat will cause a color difference. So basically, the first step is to prepare your desired area with a nice coat of finish. After that, do step 1-5. Step 6 is clearcoating the area. If you choose not to clearcoat it, you'll face decal tearing problem. Decal itself is actually very fragile but decal covered with clearcoat will be very strong.

Good Luck!

Spot The Difference!

Haha! The above image is just for some self entertainment :) I was restringing a client's guitar and was asked to use this set of strings. The packing for each string got a hand sign to tell you what number it is.. I was mischievous thus the special version of the E string appeared :D

Anyway the Gibson SG project is currently on hold as i need to source for some wood in order to fill the cavity. Here's a simple repaint, price is listed on my price.

The original

After paint stripping

After first layer of white.
Final product will be a glossy white.

Friday, August 14, 2009

Saving Gibson Sg

So recently i acquired a Gibson SG from my friend.

Friend: Hey vincent, you want a free guitar?
Me: Oh why not? What is it?
Friend: It's a Gibson SG
Me: WHAT?! YOU KIDDING ME? FREE?
Friend: Yeah! BUT! It's broken
Me: In 2 parts? Should be easy to fix..
Friend: No.. in 3!

So here's Saving Gibson SG! Let's take a look at what i received, not for the faint of heart!

We could see here how the "neck thru" is actually done. So yeah, i prefer bolt on joints way better :D
Very nasty break at the headstock -> neck portion


So i start with the headstock to neck portion first. I used paint stripper to remove the paint on the back of the headstock so as not to damage the Gibson signature series number and "made in usa" stamp marks. However! A careless mistake caused the front logo to be left with "son"! Don't worry, that can be fix easily ;)


This is actually known as the Gibson SG-X. Made in the late 80s and early 90s for a very short period. Many people (includes professional luthiers) have never seen this model. It's considered rare for Singapore. It has 24frets instead of the usual 22 and have very different pot positions.

However, i'm not interested in the original SG-X look but rather the 60s SG Jr!


I'll be posting more on the progress of how i will attempt to save this SG and give it a new life! Or you can say how i turn a real Gibson to a "fake" Gibson!
Bookmark my page up or simply add as a follower to receive the latest post the minute i post it up :)

Monday, May 18, 2009

Almost rocking!

This guitar has been coming back to her doctor(me) for quite a couple of times just because she dream to be rocking one fine day! So yes, she is almost ready now!

Things done for this project:
- Staining of body color
- Clear coating to a low gloss natural feel
- Replacing a brand new rosewood fingerboard
- Inlaying offset Mother of Pearl dot inlays
- Fretting with Jumbo frets and finishing with bullet ends

I can't wait to see her owner put her into action soon! The feeling of accomplishing other people's dream axe is just good :)